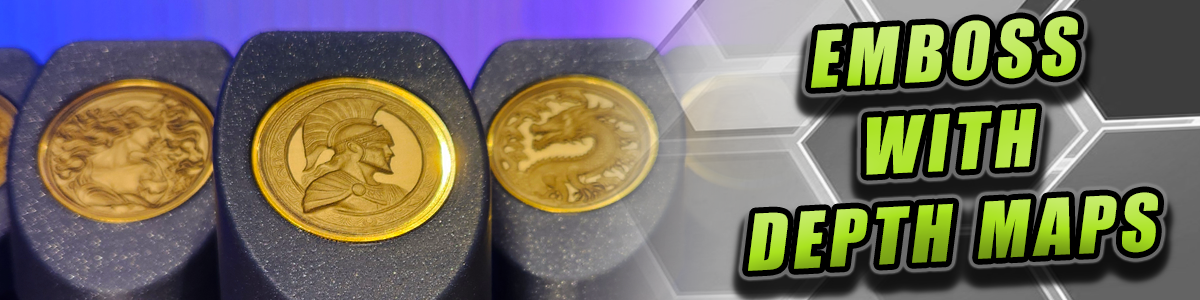
In the video above, we explore depth maps and how they are used in laser embossing using the xTool F1 ULTRA. I would encourage you to watch the video for the most comprehensive explanation as well as examples of working with depth maps.
What is a depth map?
A depth map is essentially a grayscale image where each pixel value represents the distance from the camera to the object in the scene. Unlike a regular photo, which captures the colors and textures of a scene, a depth map captures the spatial information, telling us how far each part of the scene is from the viewpoint.
Imagine you're looking at a mountain range. A regular photo would show you the colors of the trees, the sky, and the mountain itself. A depth map, on the other hand, would use shades of gray to show the varying distances – with closer objects appearing lighter and farther objects appearing darker.
How do we create depth maps?
There are several methods and workflows to creating depth maps - this is not a comprehensive list. However, here are a few examples.
- Start with a 3D model. Advanced users who are proficient with programs like Blender can create a 3D model and produce the depth map directly in Blender. Other 3D modelling programs such as Solidworks or Autodesk Fusion would require you to export the model in STL format.
Once exported, the STL can be converted to a depth map using a depth map generator such as the one at the following link: STL TO PNG
- Start with a 2D model. Perhaps you are a talented graphics artist, or are able to generate 2D images with AI models, you can convert your designs into depth maps using AI tools. One such example is Depth-R
In the video above, I show several other free examples of 2D image to depth map AI tools. However, each model will interpret the image differently and there are limited controls on the user end for controlling the output.
VistaSculpt is a paid option, but the results are very good. It produces a 3D model from the 2D image of which you can edit to your liking before exporting a 3D STL file, or a 2D depth map PNG.
How do we use depth maps?
Once the depth map has been created, we can import the file into our laser software. There are many videos available on YouTube for working with depth maps and fiber lasers using Lightburn. However, there is less information on the subject using xTool Creative Space since the F1 ULTRA is a new machine and it is xTool's first fiber laser.
The video describes the process in great detail, however, the general approach is as follows when using the xTool F1 ULTRA:
- Start a new project, select "Emboss" as the process type.
- Focus the laser on your workpiece surface and refresh the view.
- Import the depth map image, scale and crop it as necessary to fit onto your workpiece.
- Change the processing parameters of your depth map image. For the F1 ULTRA on brass coins, my settings are IR laser, 256 layers, Power 100%, Speed 1000mm/s, 1 Pass, 300 lines/cm, engraving angle 15.
- Once the job has been processed, a clean up process is necessary. Draw a solid shape around your workpiece and use the Engrave process type. Select the Fiber IR laser, 20% Power, Speed 4000mm/s, 3 Passes, 300 lines/cm.
Where to find depth maps?
If you are not interested in going through the work of creating your own depth map images, there are sources online for free and paid designs. A quick google search will yield some results. Recently, I started offering some of my own digital designs that you can find here:
Purchasing the files gives you the right to sell physical products featuring the design.
If you are looking for the depth map material test as shown in the video, click here
To use the test file, set it up like any other depth map file in xTool Creative Space. Use the 'Emboss' processing type, crop the image as necessary, and select your processing settings. Experiment with the power and speed to find the settings that yield the depth and sharpness of detail you require.
If you are looking for other products featured in the video at the top of this post, see the links below:
-
xTool F1 ULTRA Controller Holder and Mount
https://embracemaking.com/products/xtool-f1-ultra-controller-stand-and-mount -
F1 ULTRA Fixture Adapter
https://embracemaking.com/products/xtool-f1-to-f1-ultra-fixture-adapter -
3" to 4" Hose Adapter
https://embracemaking.com/products/3-inch-76mm-to-4-inch-101mm-hose-adapter - xTool Hose to xTool Smoke and Purifier Adapter
https://embracemaking.com/products/xtool-s1-3-hose-to-xtool-smoke-purifier - 40mm Challenge Coin Display Stand
https://embracemaking.com/products/40mm-challenge-coin-display
If you have not purchased your XTOOL F1 ULTRA, or are interested in other XTOOL products and accessories, see the links below. As an Amazon associate I may earn a small commission (at no extra cost to you).