In the video below I explained the installation and setup procedure of the Embrace Making Falcon 22W / 40W laser crosshairs product. The following written guide is applicable to both 22W and 40W modules.
DANGER: The laser crosshairs module is a 5mW Class IIIa red laser. Class IIIa lasers are continuous wave, intermediate power (1-5 mW) devices. Some examples of Class IIIa laser uses are laser pointers and laser scanners. Direct viewing of the Class IIIa laser beam could be hazardous to the eyes. Do not view the Class IIIa laser beam directly. Do not point a Class IIIa laser beam into another persons eyes.
Always wear your laser safety glasses when working with lasers! If you need a pair of laser safety glasses at a reasonable price, consider these here:
Laser Safety Glasses (Blue Diode / IR)
If you are a visual learner I would encourage you to watch the video below to understand the install and calibration procedure. However, to supplement the video, this is a short written guide on the setup and calibration.
What is a laser crosshairs and why do I need one?
A laser crosshairs module is a tool designed to assist operators in aligning their workpieces efficiently and accurately. It projects a crosshair pattern onto the surface of the material, providing a visual guide for precise positioning. This feature dramatically simplifies the setup process, ensuring that your designs are flawlessly aligned before starting the engraving process.
How do I align (square) my laser crosshairs module?
There are several ways to align your laser crosshairs module - however the most accurate method is to use a scrap piece of wood and simply engrave a straight line along the x axis. In LaserGRBL you can edit the blink button and add "G1 X60" to the first GCODE section. Your blink button will now engrave a 60mm horizontal line. In Lightburn you can simply draw the line using the line tool and assign it a speed and power output.
Then, make sure your wood is secured and is not easily moved. Manually move your laser head to the engraved area and align your laser crosshairs with the engraved line by twisting the body of the crosshairs module while it is mounted in the bracket. Do not use the lens cap to make this adjustment.
Tighten the crosshairs mounting screw and double check that your crosshairs have not shifted while you tightened the screw. Now your crosshairs are square with the frame of your machine and your workpieces will be properly aligned (square to the machine) when using the crosshairs as an alignment guide.
You can use the nominal offsets for the 22W and 40W modules given below in both LaserGRBL and Lightburn. However, without further calibrating the position of your crosshairs the accuracy of your engravings may be 1-2mm off from center in any direction positionally. This is because the crosshairs module is adjustable so you it may not be perfectly aligned without going through the calibration process.
Nominal offsets for normal planar (flat) position:
22W Module: X: -55mm Y: -43mm
40W Module: X: -60.5mm Y: -35mm
What is the "offset" in the context of my laser crosshairs module?
The offset is the distance in the x and y directions from the center of the laser crosshairs to the center of your working laser beam. These measurements ensure seamless integration with your engraving and cutting software. It will result in the precise positioning of your engraving with respect to the laser crosshair center (the origin of your workpiece).
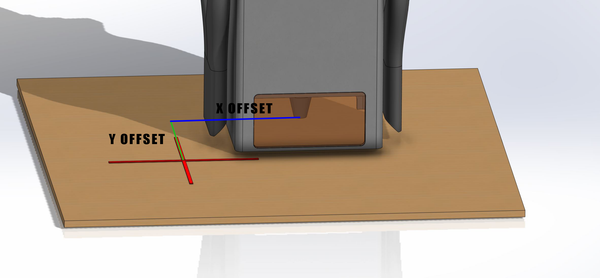
Notice that the nominal offset values above are negative. This is because the crosshairs position is to the left and downwards of the center of your working laser. This places the center of your crosshairs in the negative quadrant of a Cartesian co-ordinate system.
How do I calibrate my laser crosshair module to find the actual offset values?
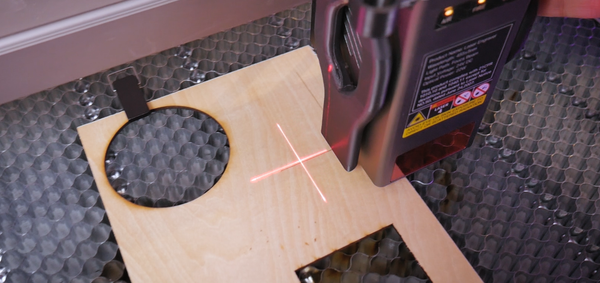
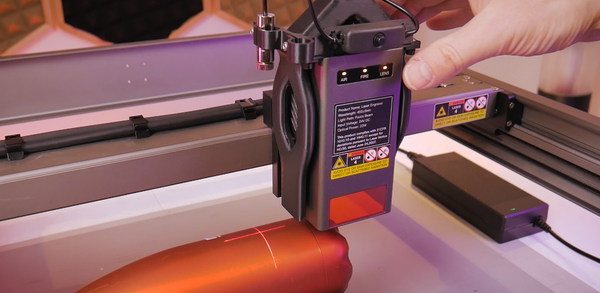
The best way to do this is to import or create an image of a square, engrave the outline and use it as a reference.
Right click here and "save as" to download a 100mm x 100mm calibration square
In LaserGRBL you can import the image of the square and resize it to 50mm x 50mm or any other size. In the offset section, use the nominal offsets provided below. You will need to edit your framing button and increase the power output to 6%. This will engrave the outer edge of the square to use as a measurement reference.
In Lightburn you can use the rectangle tool to draw a 50mm x 50mm square and set the power and speed outputs to achieve an engraved square. Much simpler. In the "device settings" you will enter these nominal offsets in the laser pointer section menu and make sure it is enabled. In Lightburn also ensure that your "start from" is set to "current position" and your "Job Origin" is set to the bottom left corner.
Nominal offsets for normal planar (flat) position:
22W Module: X: -55mm Y: -43mm
40W Module: X: -60.5mm Y: -35mm
Choose an arbitrary spot on your scrap workpiece (ensuring laser crosshairs is positioned on the workpiece and not off of it) and engrave the square. After the engraving is complete, the tool head will move back to the origin. Your crosshairs will not likely be aligned with the bottom left corner of your square.
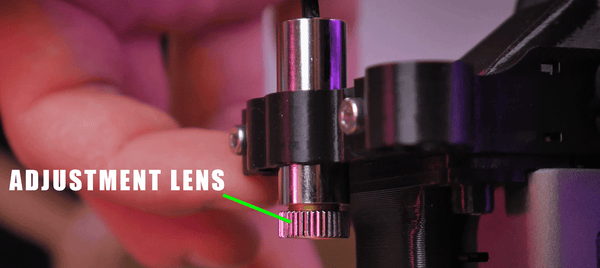
Without disturbing the position of the tool head, carefully use the adjustment in the lens (can be rotated and pushed back/forth) of your laser crosshairs to aim the crosshairs at the bottom left corner of your square. Now your crosshairs is aligned with the nominal offset dimensions.
What about the rotary position?
The Embrace Making Creality Falcon Crosshairs Module also features positions for rotary engraving. The rear-most mounting ring is for the 22W module, and the other one is for the 40W module.
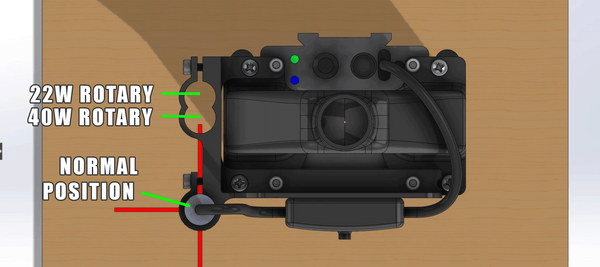
Calibrating the crosshairs in these positions will result in an ideal 0mm Y offset. This makes rotary alignment a breeze where you can easily align your tool head with the highest point on round objects like mugs and tumblers.
The calibration process is the same as the planar engraving method - you will perform the calibration first by drawing the line along the x axis with the laser crosshairs mounted in the appropriate rotary position mounting ring.
If you're using Lightburn be sure that your laser pointer offsets are disabled. Twist the body (not the lens) of your crosshair module to get it parallel with the engraved line. Do not move your laser tool head in the process. After the crosshairs and engraved lines are parallel, now you can use the lens cap to shift the crosshairs so it overlaps the engraved line. You now have a 0mm Y offset.
Then, find a new location on your scrap piece of wood. Use the same method in the flat planar section above of engraving a square. In Lightburn, you will want your laser pointer offsets enabled for this. Use the nominal rotary offsets below. In LaserGRBL you would use the same rotary offsets when importing the calibration square:
Nominal offsets for rotary position:
22W Module: X: -55mm Y: 0mm
40W Module: X: -60.5mm Y: 0mm
When the square is finished being engraved use the adjustment in the lens to align your crosshairs with the bottom left corner of your engraved square. You should only have to shift it in the X direction since we already zeroed out our Y offset.
Now you have achieved the nominal X,Y offsets for the rotary position.
Conclusion
By calibrating the laser crosshairs offset, you ensure seamless integration between the visual reference provided by the module and the actual engraving process, resulting in precisely positioned engravings.
A laser crosshairs module can be a game-changer for laser engraving enthusiasts, empowering you with enhanced precision and efficiency. By following the installation and calibration procedures outlined in this guide, you can harness the full potential of your new upgrade!
Extra
If you're looking for the original video I made showing the setup and assembly of the Creality Falcon 22W machine, see below:
As an Amazon Associate I earn from qualifying purchases (at no extra cost to you):