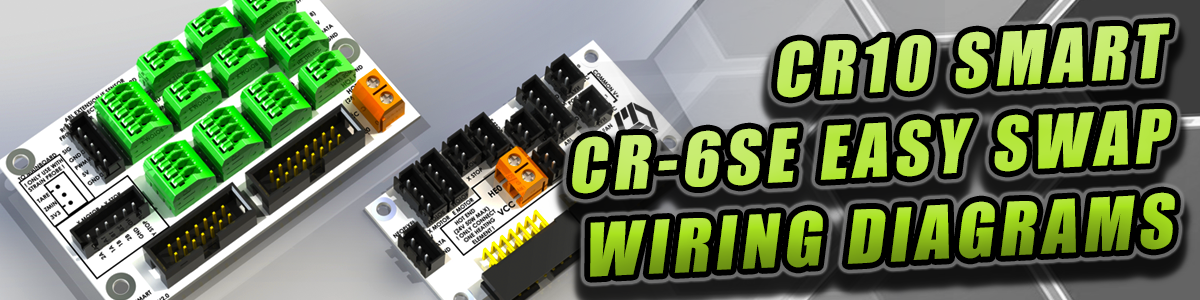
The following wiring diagrams and PCB pinouts depict a typical installation for both the CR10 Smart and CR-6 SE. Both machines are nearly identical. The installation videos specific to each machine will go into greater detail regarding the nuances of each installation.
! PLEASE REVIEW THESE DOCUMENTS THOROUGHLY !
If you are trying to retain the original strain gauge nozzle sensor instead of moving to the recommended CR-touch / BL-touch, there are caveats to doing so. This is not recommended but if you insist on trying... this means you will have to re-use the original Creality auxiliary board. I have not personally attempted this but I designed the PCBs to allow you to make it work in theory. It will come down to how you configure your mainboard firmware. The wiring documents below will explain the limitations associated with going down this path. Certain connectors on the breakout PCB cannot be used if you use the original Creality auxiliary board and if you don't pay attention you might damage your equipment.
In the wiring diagrams, you may notice the CR10 Smart is equipped with the extra Big Tree Tech Relay V1.2 to take advantage of the momentary push button that comes standard on the side of the machine. For either machine this is not necessary and can be omitted to save money - but I wanted to show how the Creality relay on the CR10 smart can be replaced with the BTT equipment and maintain similar functionality. The CR-6 SE does not have this feature and therefore did not receive this modification in the video.
If you are uncomfortable or unqualified with wiring, please consult a professional as some of the wiring involves AC high voltage lines. Always ensure your AC plug is disconnected from your outlet if you are working around these wires and connectors as injury or death can occur if you do not do this. You are solely responsible for any personal injury, losses, and/or damages by modifying your original equipment.
Additional resources can be found at the links below:
- Click here to go to Github for touchscreen and mainboard firmware
- Click here to go to Printables for STL files for mounting brackets etc (CR10 Smart)
- Click here to go to Printables for STL files for mounting brackets (CR-6 SE)
- Click here to go to PrusaSlicer Profile for the CR10 Smart X
- Click here to go to PrusaSlicer Profile for the CR-6 SE X
Parts used in this build:
- Pre-terminated JST XH kit
- JST XH Wire Extension Kit
- Big Tree Tech SKR Mini E3 V3 Control Board
- Big Tree Tech TFT35 Touch Screen
- Big Tree Tech Relay V1.2
- Bondtech LGX Lite
- MicroSwiss CR-6 SE All Metal Hotend
- Creality CR-6 SE Hotend (Alternative to MicroSwiss)
- CR-Touch Probe
- 24V 5015 Fan (CR10 Smart)
- 24V 4020 Fan (CR-6 SE)
- Neopixel Jewel
As an Amazon associate I may earn a small commission (at no extra cost to you).
Right-click on the images below and select "Open Image in New Tab" to bring up the full resolution version that can be printed on regular letter size paper and used as reference material while you are wiring your printer.